xScope makes your workflow faster and more efficient:
Loupe: Using colors in Photoshop
When using Photoshop to create new assets for an existing website or project, it can be a pain to match colors. Rather than tracking down the existing images or taking a screenshot of the website, you can use the Loupe tool to grab colors:
- In Preferences, under the Loupe panel, uncheck the "Hash mark" option
- Open the Loupe tool
- Run your mouse over the mockup and press ⌃⌥⌘C to grab the colors in the palette (in the Loupe Options side panel)
- Open Photoshop and click on the color swatch
- Select the text in the hexadecimal field (next to the "#") and press ⌘V to paste in the hexadecimal value of the color
Loupe: Getting code for colors
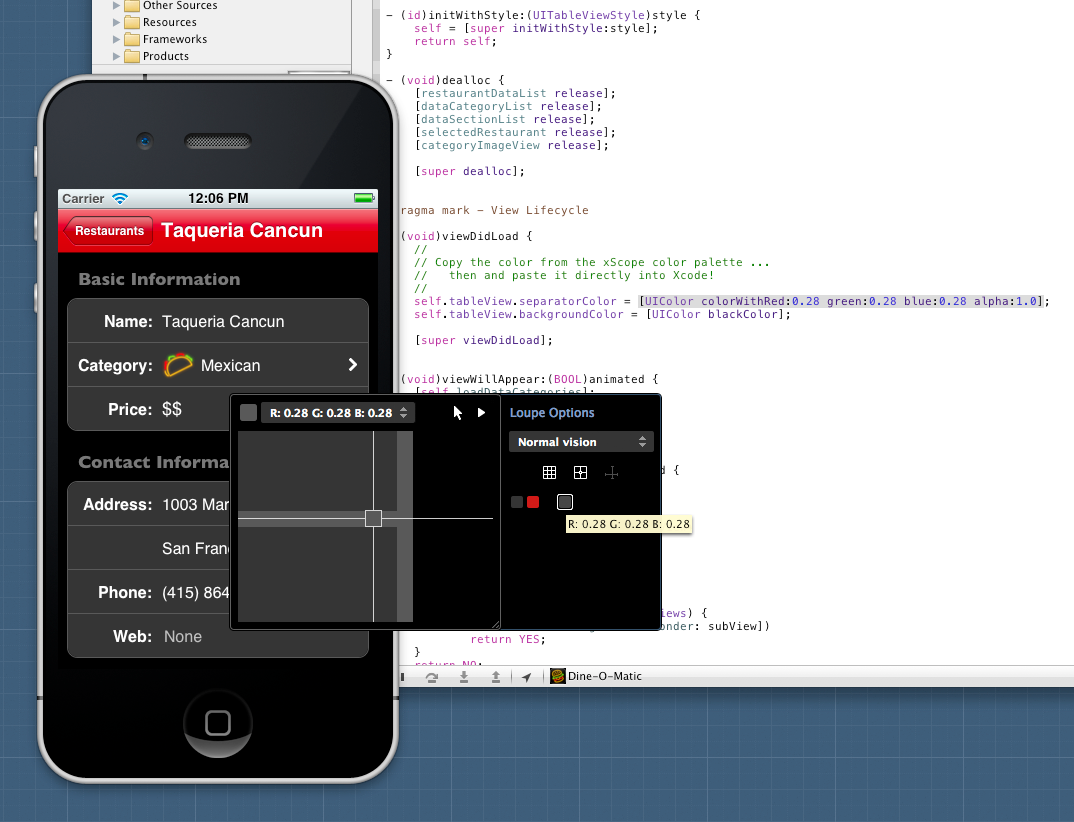
Your designer has given you an interface mockup that has all the beautiful colors for your app. The problem is that Photoshop only tells you the percentage of RGB and you need a decimal value. There's also a bunch of code to type unless you use xScope:
- In Preferences, under the Loupe panel, select UIColor or NSColor for the app colors
- Open the Loupe tool
- Run your mouse over the mockup and press ⌃⌥⌘C to grab the colors in the palette (in the Loupe Options side panel)
- Select the decimal point color format (e.g. R: 0.10 G: 0.20 B: 0.30)
- Pick one of the colors you grabbed in the palette and use ⌘C
- Switch over to Xcode and use ⌘V to generate the code for that color
If your designer also uses xScope, you can have them collect all the colors and save an .ACO file. You can then load that file into your copy of xScope and just generate the code with copy and paste.
Loupe: Drag and drop colors
After selecting a color in the Loupe's palette, you can drag it into another application. If the application is a text editor, the color will be pasted with a textual representation (based on the current color format selected in the popup menu.)
Similarly, you can also drag the color into a standard Cocoa color well. This is particularly useful when you're editing user interfaces in XIB files:
- Make sure xScope is running and the Loupe is displayed.
- In the Loupe palette, select the color you want to use in Interface Builder.
- Drag the color swatch from the palette onto the color property for the control. For example, you can drag it onto the popup menu for the Text Color property of a text field.
- The user interface will be updated with the new color.
Frames: Measure a block of text on a web page
Say you're redesigning a website, and you need to determine the size of a section of text on the page. Normally there wouldn't be any easy way of doing this, but measuring on-screen elements is a simple task when you have xScope:
- Make sure xScope is open
- Press the global hot key for shrinking a frame around a selection (the default is ⇧⌘5)
- Drag the box loosely around the selection you wish to make (accuracy isn't even necessary here!)
- A frame will appear around the text area you wanted to select, shrinking to its edges
This same process can be used to measure multiple text areas, navigation bars, and just about anything else on your screen.
Rulers: Measure several elements at once
The Dimensions tool works great when you want to measure the interior dimensions of an element, but there are times where you need to find the distance of several elements at once (like the exterior dimension of multiple CSS boxes.) The Ruler tool makes this easy:
- Open the Rulers tool
- Make sure that the calipers are shown by clicking on the icon at the left end of the ruler (next to the length display)
- Drag the leftmost caliper so that it's near the box you want to measure and hold down the Control key: the ruler will snap to the closest edge as you move it
- Now drag the end of the ruler so the rightmost caliper is near the outer dimension you want to measure (holding down the Control key to snap)
- The total length is displayed on the left end of the ruler
You can also turn on the red position indicators to get intermediate distances along the span.
Crosshair: Determine coordinates for interface elements
You just got an interface mockup of your app from your designer, with all of these images to be used in different parts of the screen. You could eyeball the placement of these UI elements, rebuilding the app as you make small adjustments, but who has the time for all that?
- Open the Crosshair tool
- Set a new origin for the crosshair (using ⌘0) that matches the design you're working with
- Move the Crosshair around on your mockup, getting the x and y coordinates of where each UI element needs to be placed
- Use these x and y values in your code
This can be especially useful if you're a Mac software developer. Just set a new origin in the lower left of your mockup, where it's compatible with AppKit's coordinate system!